Monday, August 29, 2011

Tutorial: Lunch sack style tote

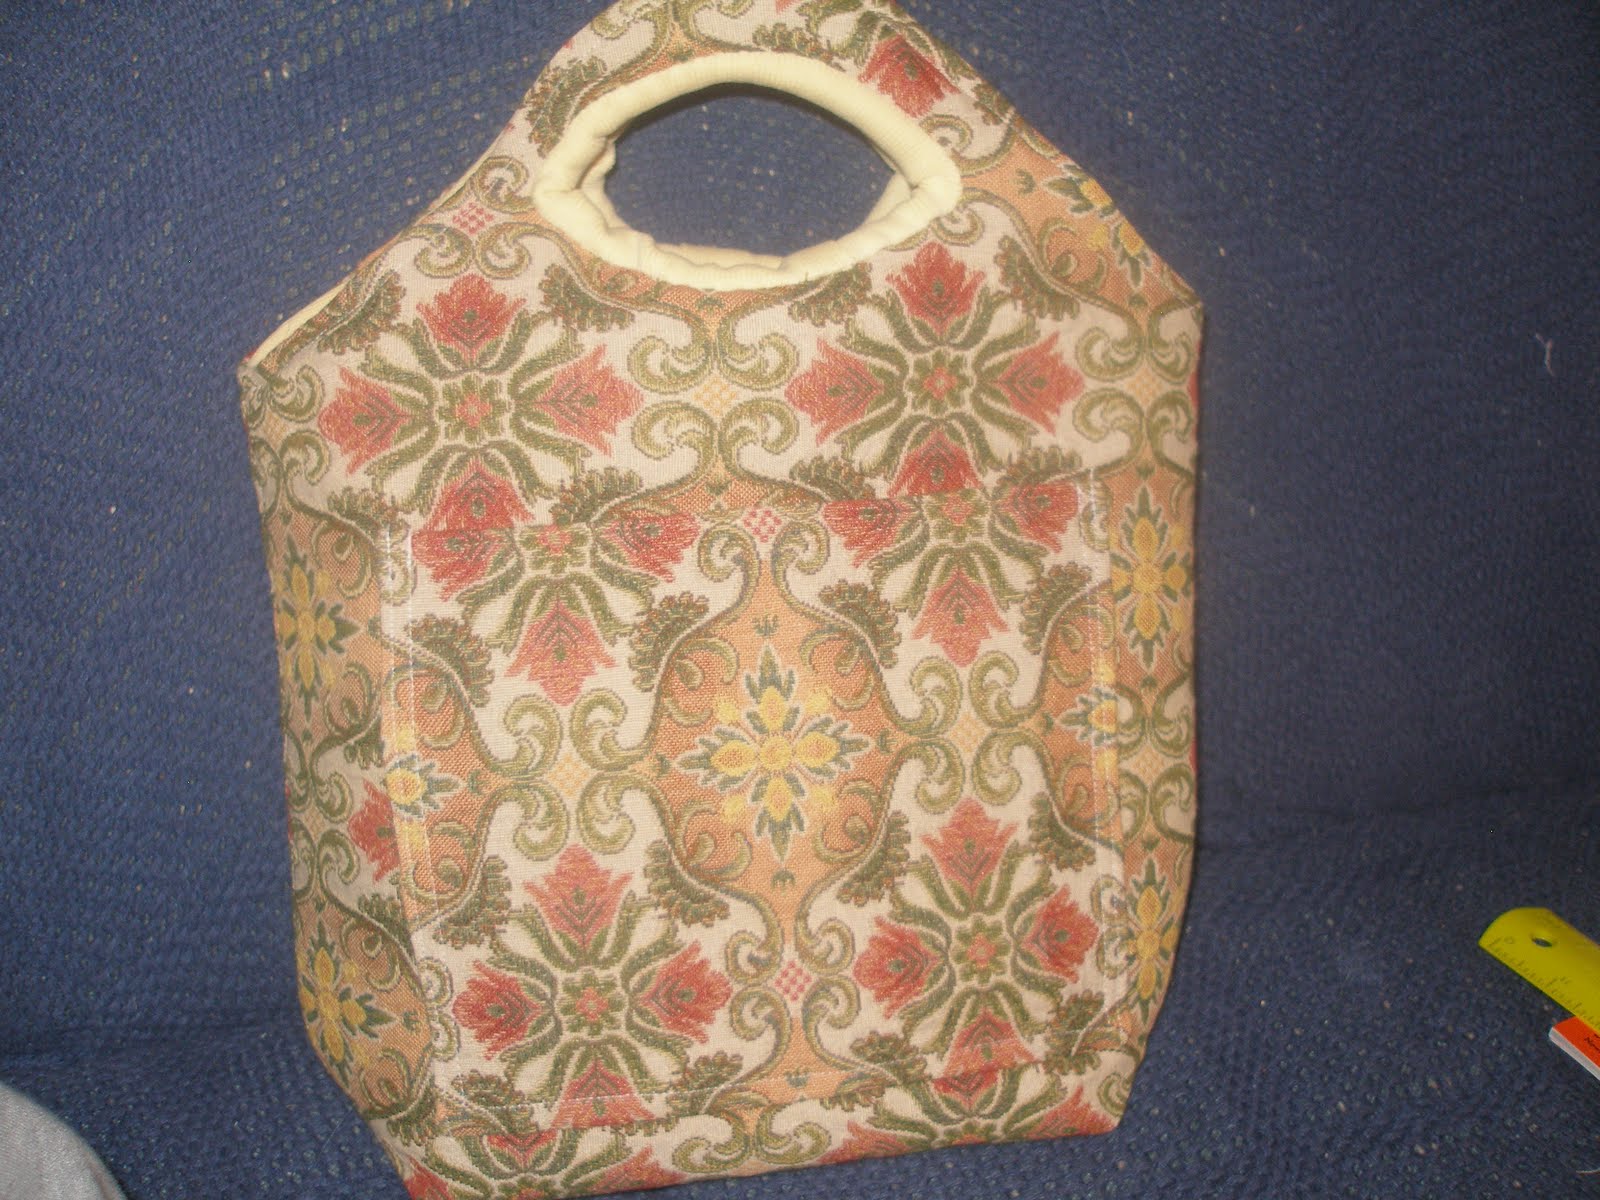
I was needing a nice tote for my little notebook computer and all my different electronic charging cords to carry with me when I go to the hospital. I also wanted it to be nice enough I can  use it as a purse. I had in mind these neoprene lunch totes with cut out handles. I thought I had seen a tutorial somewhere before, but had no luck in finding it. So I decided I can figure this out myself and make my first tutorial! Here  you go!


I started out with some foam I've had around for a while. It's about 1/2" thick. Quilt batting would work great. You can go with the fusible stuff or just regular batting. I placed my computer on the foam, drew a rectangle around the computer - leave a couple inches on each side for the box sides and room to wiggle. I only left about 1 1/2" and it did end up being a little snug on the sides with the notebook sitting horizontally like I had intended. I then added 2" to the bottom to box the bottom of the tote. And then drew a curve above to accommodate the handles.

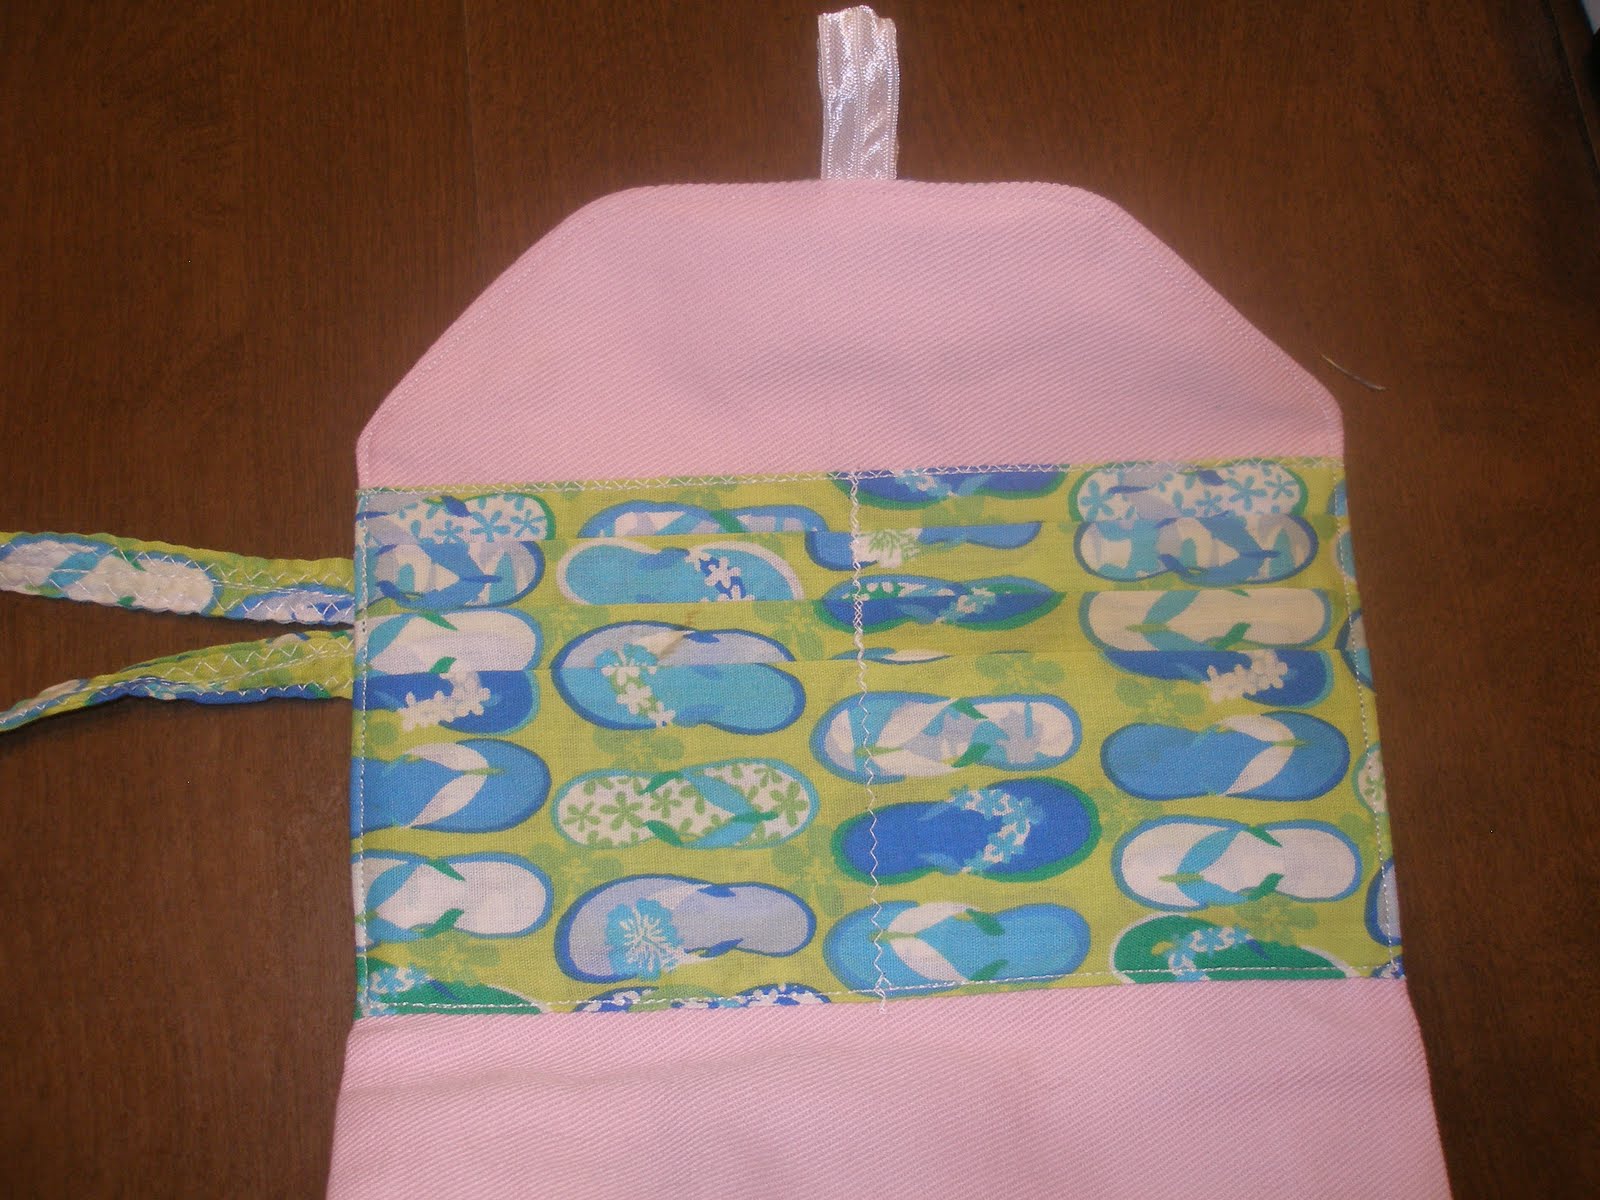
Use your batting as your pattern or make a paper pattern. Cut out 2 pieces for the outside (I used my tapestry fabric for the outer.) Cut out 2 pieces for the lining (I used one of my hubbies old heavy weight t-shirts). I then cut out a patch pocket from the outer fabric for an outside pocket and two strips about 1 1/2"  less than the width of the main piece.  Since I was using a t-shirt I cut the top of the pocket to be the bottom hem of the shirt to save myself a step.

Next step is to attach your pockets. Hem the top edge of your pockets if needed. Pin your pocket into place about 2 inches below where the curve starts. Fold under the bottom & side edges and top-stitch. For the longer pockets inside you will then stitch straight lines to divide your pockets. I did three on the shorter pocket and 4 on the taller pocket for skinnier cord bundles & pens.


Once you have all your pockets sewn on you will attach the batting to the wrong side of the lining. For non-fusible you will sew a 1/4" all the way around to make it one piece. From now on the batting is the wrong side of the lining and the fabric is the right side. Now, sew the main pieces right sides together. Sew the lining together and then the outer. Sew only the sides up to the curve and the bottom. DO NOT SEW THE HANDLE CURVE!! You should now have two flat sacks - one of the outer fabric and one inner fabric.

This would be the best time to box your corners for a flat bottom bag.  With the right sides facing in you will fold the side seam to match up with the bottom seam. This will make the corner poke out. Measure 2" in from the point of the corner and straight across the corner perpendicular to the seam.  Do this on both bottom corners of inner & outer bag.  Cut off the excess corner, leaving at least 1/4" allowance.


Now you will take one of your sacks and turn it right side out and place it inside the other sack - so you have two sacks right sides together. I left my outer back inside out, turned the liner the foam is showing and placed the liner inside the outer sack. So the layers you will see are outer fabric, liner fabric, foam.  You will now sew around the handle curve. Be sure to leave a good size opening (3-4") for turning. Careful at the side seams. I had to go back and redo the sides to catch all the layers together. Turn your bag right sides out and then tuck the liner inside the outer bag. Now you're getting an idea of what the finished bag will look like. Don't worry, we haven't forgotten about the handles!

Next you want to top-stitch all around the top. Before you start sewing reach inside and make sure the seam is pushed out all around. Then pin your opening closed being sure to fold in all the raw edges and top stitch around. You can kinda pull  the lining more to the inside while stitching if you want to make it look a little nicer.


Now for the handles.  Use a piece of heavy paper or cardboard for your handle pattern. I would make the hole an oval  rather than the pointy shape I used. The points make binding a little difficult.  You want an oval shape about an inch from the top of your bag  that follows the curve somewhat. Copy the shape onto your bag making sure it matches up on each handle. Now stitch on that line through all layers. You might want to pin this to keep fabric from wandering. I didn't have much trouble with it.


 Once you have the stitching in place, cut out your handle about 1/4" from the stitching line.


Now you will need binding. You can use ribbing, fold-over elastic, bias tape,  t-shirt fabric. Anything that has a little stretch to it to allow going around the curves.  I used a thick ribbing from the t-shirt used for the lining fabric.  Whatever you choose to use, you'll want it to be about 1 1/2" wide to accommodate going around all three layers.  You will stitch it right side to right side to the lining. Overlap your ends about 1/2" and fold under the finishing edge if needed. (Bias tape will need to be folded under. Elastic, ribbing, jersey won't ravel, so no need to fold under.) Then you will fold over and either top-stitch or hand stitch to the outside. The corners are a little fiddly. I had trouble getting them to look nice, and just had to work it into place.  I prefer hand stitching for fiddly bits like this, but if you prefer your machine, be sure to use lots of pins! 

And that's it!  Enjoy your new bag! Here's the inside of mine with my computer & accessories.


Sunday, August 28, 2011

Something different

We're working on getting our house better organized.  I was cleaning my dresser top & decided I need a better place for my necklaces. Maybe if they aren't hidden away in the jewelry box, I'll wear them more often! I had a few scraps of wood from a little project I did with Madeline.

I used a 1/2" strip of balsa wood and drilled holes every inch.


I had several bamboo skewers, I cut them into 1 1/2" pegs with the wire cutters. The wire cutters seemed to work the best to cut the skewers and I got a cleaner cut with a pinching a bit then turning and pinching more till the cutters went all the way through. I did have to be careful and they went flying when they pinched off.


I put a drop of wood glue into each hole  (leaving the two on the end empty for a screw/nail to attach to the wall) and starting putting in the pegs.  My daughter enjoyed helping catching the flying pegs and helping put them in.


Paper underneath to keep glue from getting all over the table.
I had to use the hammer to get the pegs all the way in and straight.


Once the glue dried I hung it up on the wall and starting hanging necklaces. It held together & didn't fall off the wall!


Now all my necklaces are up where I can see them and find what I want quickly and they won't get all tangled up. There was also enough extra pegs to put some bracelets up also.  Enjoy! Hope this inspires you to try something new!

Tuesday, August 23, 2011

Baby Hats

Since I'm due in October, have several friends due in October or November and a couple cousins due this winter also I was looking for quick & cute baby gifts. Came across a bunch of cute crochet patterns for newborn hats. I posted pictures of the hats I've done already on facebook, but thought I should put them on here with links to the patterns for other hookers.

We'll start with my personal favorite. Allicrafts provided the pattern for the earflap newborn hat .  I used a variegated cotton yarn in white, light blue & lime green. Instead of doing the braided strings on the earflaps I just did a chain and went over it with single crochet as I went around the edge of the hat. I think I'm keeping this one for myself.

Next up is the deeply textured hat also from Allicrafts. This is also done in cotton yarn - bright red this time. The texture doesn't show up as nicely in the picture as in real life. You can see the texture of the stitch on the pattern website. It's really a beautiful looking hat. This was one of the smaller newborn hats. I chose not to finish the edge with the crabstitch as it isn't very stretchy. I just did a final round of single crochet around the bottom.


Number three hat is the fuzzy bear hat , again from Allicrafts. She has some very nice patterns. She has also included the pattern for 3 and 6 months size.  I used some leftover homespun yarn in brown & blue. I didn't quite have enough brown for the hat and ears, so made the ears in blue and then added a blue stripe to tie into the ears color. I think it turned out extremely cute.  This is my 2nd favorite hat.


Now a pattern from a different site. "The blue crab stitches at midnight" offers this cute pattern for the sweet and simple newborn hat . This was done in a purple cotton yarn. It's a very simple pattern, good for beginners. The scallops going around the bottom make the edge a little less stretchy but this hat is a little larger. I think you could fold up the bottom edge a bit for the newborn and let it down as baby gets a bit bigger. I left this one plain, but may add a flower later in a complimentary color. It also might look nice with the scallops done in a different color.
I did another hat from this same pattern. This one is done in "I love this wool" I think. I can't find the remnant that had the label on it. It 's a nice soft yard in a very soft pink color. I added a couple of simple 5 petal flowers in the same yarn and edged one in purple with sc.


Next, back to Allicrafts for the bobbolicious newborn hat . I found this hat to come out a little small so I took it apart and added a round before starting the bobbles to give just a little more head room. This was done in a light, creamy yellow cotton. It makes a cute little bobbly hat. Sorry the picture came out blurry. I couldn't get the camera to focus.

Our model is a baby doll we've had for several years. My 7 yr old got this baby when her brother was born and since it was bigger than all her other baby dolls, it earned the name "Bigger" and the name has stuck. Bigger is very close to newborn size so he's good for trying on patterns. Hope you enjoy the patterns as much as I did!


Sunday, August 21, 2011

Birthday Present


Needed a quick and cute present for my niece and was thinking something for her Nintendo DS, but she's planning on trading it for a newer one soon, so I'm not sure what size it is.
Outside front with button
Inside pockets before sewing closed
Outside back with flower.

I came across this wristlet tutorial on whipup.net that looked like it would be flexible enough to be used for whatever she needs to carry.  I had this cute flip flop bright green fabric & a pink denim. The main piece is padded and the outside pocket is also padded. It has lots of little pockets for games on the inside. I changed the button loop to elastic instead of a fabric loop so it would have a bit more stuffing room. I also thought it needed something on the back so I made a flower like this one out of the pink denim. I had a cute little green flower button to finish off the flower & a big antique grey button for the front.

Back view with safety pins
"Give me the camera, Momma"
Also I finally got a picture of this cute dress I made for S. about a month ago. The main fabric was a large flat sheet we found at Goodwill for $3 (I'm getting lots of use out of it) The contrast fabric was from Nana.  The pattern is from this cute ruffle top I was thinking of making for myself.  Making clothes for the 19 month old is so much more fun.  I followed her instructions as is. The shoulder straps are a little long so I think I'm going to add buttons on the back so I the straps can open to put on. Currently she's just wearing it with safety pins. It's floor length for her but she likes it and it's super cute so I think I'll just leave the length for now.

Thursday, August 18, 2011

Beginning

Well, this is my first blog post here. I used to have a crafty blog, but wasn't using it and shut it down. Maybe it had something to do with new babies and figuring out how to take care of them. I've never really quit crafting but it certainly took a down swing. I'm now pregnant with number 4 and finding myself in a flurry of crafting. Maybe it's the nesting instinct, I'm not sure.  I've found my rhythm with 3 kids and I'm sure it'll take a little time after this one arrives to get back into it, but I think having this blog will help encourage me. I tend to be a night owl, so my personal crafting comes in at night after the kids are in bed. It's awfully hard to do sewing or anything involving sharp objects with an almost 2 yr old who will always grab said sharp object first. 

I always have lots of WIP, some of which have been there for months. Currently working are a blue cotton crocheted wrap for me.  I have a couple of toddler dresses cut out that just need to be sewn up. A couple of matching pillow case dresses for oldest daughter & cousin. I made several covered crates & boxes a few weeks back for nice looking organization. I have since come across a couple more boxes I want to cover and some fabric that's been sitting in the stash for a while waiting  for a purpose.  That's just for starters. I'll get some pictures up soon and I'll be posting links to blog inspirations regularly.

Enjoy!!