
Saturday, October 12, 2013
Zentangle challenge
This weeks challenge: learn and use eights part dos. This was a little tough to figure out, but I like the finished product.
Saturday, September 28, 2013
Works in progress
My weekly zentangle challenge. The challenge this week was circles vs squares. This was fun and easy and Phil says "WOW!" He wants to use it for an album cover :) Jeremy started on one, but got distracted and never finished. So maybe he'll join me again for next week.

Next up in my projects this week. A crochet project all for me! Most of my crochet goes to other people. One of those funny things. I crochet a lot, but hardly have anything crocheted of my own. So I found this hook case on pinterest. It's a free pattern on Ravelry and I'm loving the way this is made. All in one piece, no sewing together. I'm adding a couple more pockets than the pattern has and making a few a bit bigger for my bigger hooks. I finished the inner part this morning and you can see several hooks have already found their way in. working on the outside tonight!

I'm also working on using up some denim fabric I was given. Have been wanting to do some hotpads for stocking stuffers and found some cute patterns for little microwave hot pads on pinterest. Not actually using a pattern, just making up my own as I go. That's a lot of pinterest stuff I see. I use the idea to make my own or mash a couple of things together. Best of both worlds!

I still need to get heavy terry cloth for the insulating layer and some bias tape cut to bind it all together, but I think they'll be cute when they are finished.
Monday, September 16, 2013
Zentangles
I've recently discovered Zentangles... or rediscovered... this was what my mom did to help us keep quiet and calm during church. She would draw a loopy figure on a piece of paper and then handed it to me to fill in each space with a different design. It was a great way to occupy your hands yet still be able to listen to the sermon. I've found myself often, through the years, grabbing a piece of paper and a pen to doodle and listen. I've never really thought of myself as a doodler. You know there are some people who just always have drawings/ fantastic, amazing doodles in the margins of everything! I was never one of those. My doodling consisted of either the exercise mentioned above or if I didn't have plain paper, go through the text (on a church bulletin) and fill in all the circles - o,p,a,e,d,b, etc.. Not super exciting stuff.
My 2 older kids are now 9 & 6 and I recently, needing something to help them sit quietly, pulled out some paper and pens and introduced them to my mom's old "game." In a rare moment of quiet, I googled doodling and came across zentangles. It's a "thing" now. You can be a certified teacher. You can go on retreats and seminars to learn all about it. You can by zentangle kits and books. WOW! I'm hooked all over again.
So, what's so great about this Zentangle thing?
1. Small format - They use a small "tile", about 1/4 of letter paper. This smaller size is much easier to tackle in a shorter amount of time. It's also not quite so overwhelming!
2. Official tangles - Zentangles has about 120 "official tangles." This very nice website Tangle patterns.com has hundreds of patterns. These are designs that are simple to draw, simple to teach and don't require any "predrawing." The cool thing here, especially for me, is all these designs that are shown step by step how to draw and then you can go from there and play with it and make it your own or use it as it is.
I love this because my repertoire was pretty small. I had stripes, staight, wavy, zigzag, thick and thin. I could go wild and do plaid! Then there were polkadots and spirals and checkerboard. Throw in some flowers and maybe some leaves, but that's about it for me. So I'm really loving seeing all these beautiful designs that I can learn and play with.
3. Community - Since this is a "thing" now there are people all over the world doing zentangles and sharing with each other and doing cool things with it, like decorating shoes and wooden bowls!

I was finishing up my drawing for this weekly challenge and my 6 yr old son sat down beside and said "I want to do that too!" I let him pick out a paper and handed him my pen and showed him how to draw one of the patterns, then another and another. He finished his own tile pretty quickly and added color to it. He's very proud of his artwork and I am too. We also really enjoyed Mom & Son time! I'm definitely going to have to make this a regular date!

My 2 older kids are now 9 & 6 and I recently, needing something to help them sit quietly, pulled out some paper and pens and introduced them to my mom's old "game." In a rare moment of quiet, I googled doodling and came across zentangles. It's a "thing" now. You can be a certified teacher. You can go on retreats and seminars to learn all about it. You can by zentangle kits and books. WOW! I'm hooked all over again.
So, what's so great about this Zentangle thing?
1. Small format - They use a small "tile", about 1/4 of letter paper. This smaller size is much easier to tackle in a shorter amount of time. It's also not quite so overwhelming!
2. Official tangles - Zentangles has about 120 "official tangles." This very nice website Tangle patterns.com has hundreds of patterns. These are designs that are simple to draw, simple to teach and don't require any "predrawing." The cool thing here, especially for me, is all these designs that are shown step by step how to draw and then you can go from there and play with it and make it your own or use it as it is.
I love this because my repertoire was pretty small. I had stripes, staight, wavy, zigzag, thick and thin. I could go wild and do plaid! Then there were polkadots and spirals and checkerboard. Throw in some flowers and maybe some leaves, but that's about it for me. So I'm really loving seeing all these beautiful designs that I can learn and play with.
3. Community - Since this is a "thing" now there are people all over the world doing zentangles and sharing with each other and doing cool things with it, like decorating shoes and wooden bowls!

This is my first finished tangle!
I was finishing up my drawing for this weekly challenge and my 6 yr old son sat down beside and said "I want to do that too!" I let him pick out a paper and handed him my pen and showed him how to draw one of the patterns, then another and another. He finished his own tile pretty quickly and added color to it. He's very proud of his artwork and I am too. We also really enjoyed Mom & Son time! I'm definitely going to have to make this a regular date!
Jeremy's very colorful first tangle!

Tuesday, August 13, 2013
Crochet star blanket tutorial

A dear friend of mine wants to learn the star blanket pattern. Bonus, I've been wanting to learn this one too. She printed out the free pattern from Bernat.com and I brought it home to work on. It's a beautiful and simple pattern. Once you figure out the pattern it's easy and one you can work on while watching tv.
I found some nice mohair, baby weight yarn in my stash and had enough blue and white for this pattern. This is a pretty flexible pattern. Since you are doing rounds until it reaches the appropriate size, you really could use any yarn you like and it should work fine.
Thanks!
Thursday, August 8, 2013
Origami paper


I tore out a bunch of colorful pages from a magazine. I could have used the print pages too, but thought they'd enjoy colorful squares for now. Next I folded and cut the pages in half to make squares a little smaller and also to give me three straight edges to fold squares.

This can be done one page at a time, but I found it went faster doing it production style. One step on all pieces, then move to the next step on all pieces.

Next was to do the diagonal fold to establish a square so I know where to cut.
Almost done, cut the squares out.

And finally, flatten them and put them in a box. Yay for free origami paper!!

I got pretty consistent squares using the half sheets and they are a good size for folding. I did cut a few pages at 2/3 or something other than 1/2 to capture different colors. Those are the bigger squares you see in the box.
Thursday, June 27, 2013
What are you doing?
Found this book at the library. Some of the techniques I'm familiar with (beaded, Tunisian, hairpin lace), but there are a few new things I want to try out.

First I'm trying entrelac. This was chosen first, cause the other project i want to try requires multiple colors. I've seen entrelac in knitting, but have never tried it before. The whole squares are pretty easy once you figure out what's happening, but I'm struggling a bit figuring out the edge triangles.

I really want to try the overlay crochet shown on the cover, so pretty! Anyways, the book has lots of neat projects in it, check it out!
I'm trying this new thing. Actually doing some of the cool patterns I have pinned on Pinterest. :) The winner this week is this cute little owl purse pattern at Maggie Makes Stuff and had to try it out. I still need to add the zipper and lining. But isn't she cute!! I might add a little strap too, but haven't decided yet.

Lastly, I joined The Crochet Crowd Amazing Shawl challenge this month. It was a lot of fun to work on. Once I got used to the pattern it was easy to work on while sitting with the kids at bedtime. The nice thing is this pattern is a "join as you go" which means no sewing when you finish crocheting everything. Just hiding your tails, which you should be doing as finish each element anyways. But sometimes we get lazy and just want to finish the project already!! Yes I spent a couple days of just weaving in ends, Blah!

Close up of the design. Can you tell I'm on a purple kick this month?

Finished shawl! It's huge, about 6 1/2 ft long! So proud of myself for finishing the whole thing!!
So that's what I've been working on. How about you? What projects do you have in the works?
Thursday, June 6, 2013
Farmer's market craft booth

These are the main attraction. I'm making these beaded lace headbands for $15. I have made these with a loop of elastic at the back so they are stretchy and adjustable to fit most heads. I have some already made or I am always willing to make one in colors you would like. I can also add a jewelry clasp instead for $2 extra to be worn as a choker or wrap twice around your wrist as a bracelet.

I also enjoy making cute flowers in between projects or just to use up ends of yarn. I put them on elastic loops for hair ties.

This is my latest project. Learning some new bead crochet techniques. Starting with basic beaded chains, this one ended up being about 18 inches long. I love the fluorescent beads on the black chain. Reminds me of the 80's!

I also have one super cute newborn crown in light pink. That's it in the bowl with the flowers.
Sunday, May 19, 2013
Old jeans into fabulous new skirt!
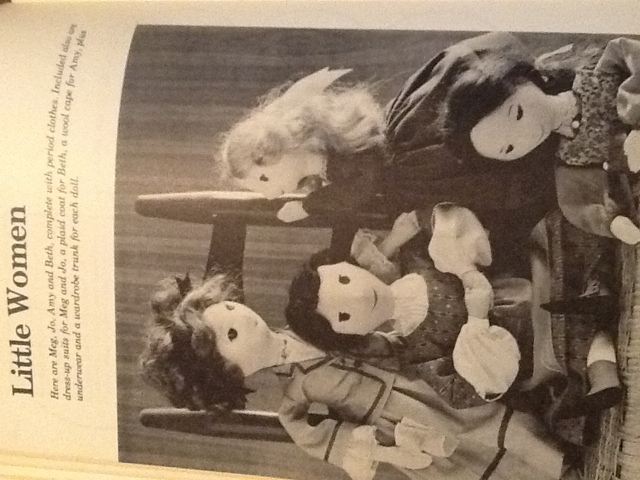
Looking for fabric for my daughter's doll project, I discovered this old pair of jeans prepped for making into a skirt. I had taken out all of the inseam and then for some reason put them aside for another day. I was wanting a new skirt for Spring, and this was a perfect, quick and easy project.

1. Cut just beside (under) the seam on the front crotch on the curve so the cut away part will lay flat underneath side with the seam. The seam can lay flat on top and be topstitched down.


3. At this point, I tried it on to check fit. Everything looked great except it dragging the floor. While I love the floor length look, 4 kids running around makes floor lenght very impractical. I took off 6 inches to bring my hem up to ankle length.

4. I've had this gorgeous, embroidered fabric sitting for a while, waiting for the right project. I decided to cut my gores on the bias, so I matched a corner with the point of my triangle on the jeans and matched up the straight edges. This made the gore fuller than the opening triangle which made a lovely flare. I curved the gore just a bit to match the curve the legs were making.


6. Next I lined up the edges of the gore under the edges of the jeans and stitched along the previous seam lines.

7. To finish up the bottom seam I used a straight stitch to attach lace all around the bottom edge, then pressed the raw edge under and edge stitched to keep the lace facing down.

8. Sorry for the bad pic, didn't have anyone to be photographer for me.
.JPG)
Sunday, May 5, 2013
Cloth Diapers -AI2
I finished a couple of All-in-2 diapers for a customer this weekend. Got to try out the new Zorb II. It's very thin and has a nice soft jersey outer layer so it can be used alone without needing to be encased.
All-in-2 diapers can be used just like an all-in-1, everything gets washed when wet or dirty, but the absorbent pad comes separate from the cover to speed drying time some. You do have to pair them back up after laundering, but no pocket to have to stuff.

First Step: Using diaper pattern of your choice (I made this pattern to match measurements, sort of based on the shape of Fuzzi Bunz). Cut out one each of PUL fabric, soft lining (velour), and cotton cover (optional).
I used a waterproof layer of plain white PUL with a cute cotton print layered outside of it just for looks. The white PUL is fine by itself if you like white diapers. Inside I used jersey velour. Very soft stuff that helps to wick moisture away from skin.

I layered them together the way I want them in the finished diaper. So that's cotton on the bottom, right side down, then the PUL shiny side facing up (into the diaper), lastly, the velour, fuzzy side up).

Next for gussets, sorry I didn't get a picture. You just need a semi circle piece that matches the curve on the leg. I just keep the curve that is leftover from cutting out the PUL layer and cut a straight line across to match two points about 1/4 of the way down the curve on each end. We then sew on fold over elastic while stretching across the straight edge. This gives you a gathered straight edge with the curve unbound.


Attach the gusset pieces to the inside layer of the diaper, matching the curve they came from. Wrong
side of the gusset should be facing the inside of the diaper. Now we're ready to attach the FOE to the diaper.

I like to start at the back, stretching the FOE across the middle of the back and around the leg curves. To start the FOE use a zigzag stitch, backstitch a little at the beginning and then you can use the thread tail to pull Be sure to catch the gusset edge in the elastic also. Stretch just enough on the rest to conform to curves.
When you get all the way around, just overlap the elastic a bit. No need to fold under the ends or anything, it doesn't fray.
Last is the velcro. I usually attach the loop side on the tabs, since it could come in contact with skin. About 1 1/2" square is usually sufficient and I just zigzag all around to secure it down. Then the hook side is on the front of the diaper. Usually, a long strip across the front about an inch down from the top and an inch or two from each side to give plenty of room for size adjustment.
 To make the cover into an all-in-2, I added a strip of velcro to the back inside of the diaper a couple inches from the edge.
I made an rectangular insert (1" less than the width of the cover in the middle and 1 or 2" less than the length of the cover) from 3 layers of Zorb-2, zig-zag stitched all around the edge. If using regular Zorb, it needs to covered in another fabric like the velour used for the inner diaper or flannel. The Zorb 2 has jersey on the outside and is pretty soft. Attach a strip of hook tape to one side of the insert an inch or two from one end to hold it secure in the cover.
Washing Instructions:
To seal up holes from stitching, you can put the cover in a hot dryer before use. Avoid using the dryer for regular laundering as it weakens the PUL. Wash in hot water, no bleach and definitely no fabric softener and hang to dry. I always use white vinegar in my rinse cycle. It helps remove odors and helps all soap rinse away.
With any absorbent diapers, you need to wash and dry them a few times (preferably in nice hot water) before use to "fluff" them for maximum absorbancy. Expect to get a bit of shrinkage in this process.
Never use fabric softener on cloth diapers, it causes fabric to repel liquids, definitely not something you want diapers to do!
All-in-2 diapers can be used just like an all-in-1, everything gets washed when wet or dirty, but the absorbent pad comes separate from the cover to speed drying time some. You do have to pair them back up after laundering, but no pocket to have to stuff.

First Step: Using diaper pattern of your choice (I made this pattern to match measurements, sort of based on the shape of Fuzzi Bunz). Cut out one each of PUL fabric, soft lining (velour), and cotton cover (optional).
I used a waterproof layer of plain white PUL with a cute cotton print layered outside of it just for looks. The white PUL is fine by itself if you like white diapers. Inside I used jersey velour. Very soft stuff that helps to wick moisture away from skin.

I layered them together the way I want them in the finished diaper. So that's cotton on the bottom, right side down, then the PUL shiny side facing up (into the diaper), lastly, the velour, fuzzy side up).
I stitched the three layers together with a straight stitch close to the edge just to keep them from sliding around while attaching FOE.
Remember: when sewing PUL you want to avoid making unnecessary holes, so no pins, I usually use paper clips to hold layers together.
Remember: when sewing PUL you want to avoid making unnecessary holes, so no pins, I usually use paper clips to hold layers together.

Next for gussets, sorry I didn't get a picture. You just need a semi circle piece that matches the curve on the leg. I just keep the curve that is leftover from cutting out the PUL layer and cut a straight line across to match two points about 1/4 of the way down the curve on each end. We then sew on fold over elastic while stretching across the straight edge. This gives you a gathered straight edge with the curve unbound.


Attach the gusset pieces to the inside layer of the diaper, matching the curve they came from. Wrong
side of the gusset should be facing the inside of the diaper. Now we're ready to attach the FOE to the diaper.

I like to start at the back, stretching the FOE across the middle of the back and around the leg curves. To start the FOE use a zigzag stitch, backstitch a little at the beginning and then you can use the thread tail to pull Be sure to catch the gusset edge in the elastic also. Stretch just enough on the rest to conform to curves.
When you get all the way around, just overlap the elastic a bit. No need to fold under the ends or anything, it doesn't fray.
Last is the velcro. I usually attach the loop side on the tabs, since it could come in contact with skin. About 1 1/2" square is usually sufficient and I just zigzag all around to secure it down. Then the hook side is on the front of the diaper. Usually, a long strip across the front about an inch down from the top and an inch or two from each side to give plenty of room for size adjustment.

I made an rectangular insert (1" less than the width of the cover in the middle and 1 or 2" less than the length of the cover) from 3 layers of Zorb-2, zig-zag stitched all around the edge. If using regular Zorb, it needs to covered in another fabric like the velour used for the inner diaper or flannel. The Zorb 2 has jersey on the outside and is pretty soft. Attach a strip of hook tape to one side of the insert an inch or two from one end to hold it secure in the cover.
Washing Instructions:
To seal up holes from stitching, you can put the cover in a hot dryer before use. Avoid using the dryer for regular laundering as it weakens the PUL. Wash in hot water, no bleach and definitely no fabric softener and hang to dry. I always use white vinegar in my rinse cycle. It helps remove odors and helps all soap rinse away.
With any absorbent diapers, you need to wash and dry them a few times (preferably in nice hot water) before use to "fluff" them for maximum absorbancy. Expect to get a bit of shrinkage in this process.
Never use fabric softener on cloth diapers, it causes fabric to repel liquids, definitely not something you want diapers to do!
Friday, May 3, 2013
Fabric plans
Just a teaser.
Tea dyed some cotton last night for this project that my daughter picked out. :)

Tea dyed some cotton last night for this project that my daughter picked out. :)
Tuesday, April 16, 2013
Roast Veggies recipe
Fasting (no meat or meat products) for the lenten season brings out my cooking creativity. Needing a dish for potluck I dug through the refrigerator and tossed together a beautiful looking dish of roast veggies. I just used what I had available and you can too. So here is what I did.
Heat up your oven to 450 degrees F. You don't want to have to wait for it to heat up later when you're done chopping. Get out a baking dish and use appropriate number of vegetables to fill your dish. (The amount in the parenthesis is for a large casserole dish)
I started with potatoes, carrots and onions. Can't go wrong with that combo. Add in some crushed garlic, lots of crushed garlic (or less if you're not a big fan of garlic). Garlic & onions add a lot of flavor. Purple (red?) onions are even better if you have them. (3-4 potatoes & carrots, 1 full onion, 6 cloves garlic)
Next I went looking for color. I added in a red bell pepper chopped up. Tossed in some sliced mushrooms and quartered brussels sprouts. So now I've got red, orange, white, green, purple. Oh yeah, yellow squash and we've got rainbow roast veggies!! (1 pepper, 1/2 cup mushrooms, 6 brussels, 2 yellow squash)
Throw all your veggies in a baking dish as you are chopping. Fill it up and make it a feast for your eyes.
Hungry yet?
Toss everything with a few tablespoons of your favorite oil and salt and pepper as you like. I love Real Salt, it has a great flavor and lots of extra minerals too. A little dash of pepper (or more if you like it spicy) adds a bit more flavor.
Cover your pan with foil and bake in the hot oven for about 30 minutes. The onion and garlic smells will be wafting through your house causing your mouth to water even more. I know it's hard to wait when it smells that good, but make sure your potatoes & carrots are tender (should break apart with a fork easily) before you take it out.

It's done, it's done. Don't burn your mouth!! Enjoy!
Saturday, April 6, 2013
Banana bread

I recently found a cool new recipe site called My Recipe Magic. The site owners have set it up so that when you post a recipe on, you get a percentage of the advertising proceeds. I think this is a really cool idea and could use a little extra cash, so I'm going to be posting a few recipes as I make them at home.
So this is my first recipe to post there. I found a pretty decent recipe for banana bread years ago called Ovaltine black bottom banana bread. It was intended as a cake style, with chocolate bottom. I really liked the taste of it though and have been using it and altering it through the years as our diet has changed.

I've added in some whole wheat flour, made it egg and dairy free and lowered the sugar amount. It's still a delicious, moist bread that gets devoured as soon as it's cooled. When I take it to potluck, I never have leftovers to take home. That makes me sad, so I have to make 2 loaves at a time now.
Here's a link to the recipe on My Recipe Magic.
Try it, you'll like it!
Monday, April 1, 2013
Baby Showers
We have lots of baby and wedding showers coming up soon, and me with no money to spend. I like to give handmade gifts anyways! I just have to be a bit more creative in using supplies I already have or find a nice upcycling project.
I have plenty of yarn, especially cotton and I love baby shoes. There are so many amazing free patterns on the internet. These are the ones I liked.
Some really cute loafers (with video tutorial) from Crochet Hooks You for the boys and some adorable slippers for the girls from Moira Crochets.
I have been working on thinning out my fabric stash, but still have enough for some baby footwear. They use such small pieces. I also think denim for baby shoes is super cute & and great way to re-use worn out jeans. Again, some nice free patterns. I love the pinstripes on these little man shoes from Schwin & Schwin or these nice basic baby shoes from Stardust Shoes to personalize with fabric or embellishments.
For friends I know are going the cloth diaper route, and if I have appropriate fabrics, I can do some diaper covers or inserts. But, that'll have to be another post. I don't have pictures ready.
For weddings I like to do nice napkins. I am striving for a greener lifestyle and cloth napkins help to cut back on paper use and they're nice for fancy dinners too. There are lots of ways to finish the edges on napkins, I like the mitered corners shown nicely by Skip to my Lou, they look extra fancy.
PS. Need to get someone to teach me how to do picture links!!
Monday, March 25, 2013
Tent Hair


Sunday, March 17, 2013
Sidewalk Chalk


We took advantage of the slightly warmer weather and dry days to get out the sidewalk chalk. The kids all enjoyed being out in the sunshine. Sophia enjoyed doodling, Timothy just watched. I think he tasted the chalk and decided it was better to carry around and throw than to eat!

Madeline & Jeremy have been on a checkers kick lately and wanted to bring the board game out with them, but I talked them into creating an outdoors board.

We scoured the yard for orange and grey rocks and found enough for playing pieces.

They each drew their own board in chalk and enjoyed a few games of chalky checkers!

Jeremy also decided the picnic table needed decorating. I think it turned out beautifully!

He's quite the artiste, very focused while he works.
Subscribe to:
Posts (Atom)