Tuesday, August 13, 2013

Crochet star blanket tutorial


A dear friend of mine wants to learn the star blanket pattern. Bonus, I've been wanting to learn this one too.  She printed out the free pattern from Bernat.com and I brought it home to work on. It's a beautiful and simple pattern.  Once you figure out the pattern it's easy and one you can work on while watching tv.
I found some nice mohair, baby weight yarn in my stash and had enough blue and white for this pattern.  This is a pretty flexible pattern.  Since you are doing rounds until it reaches the appropriate size, you really could use any yarn you like and it should work fine.


This is my very first video tutorial and I was reading the pattern for the first time while doing this video.  Give me some feedback, let me know how I did and if you would be interested in any more.

Thanks!

Thursday, August 8, 2013

Origami paper


The kids have been wanting to do more origami lately and I don't have money to buy special paper for them.  I also don't want them using up all the notebook and printer paper.  I do, however, have a plethora of old magazines waiting to be used.  Origami paper from magazines!  Coming right up!

I tore out a bunch of colorful pages from a magazine.  I could have used the print pages too, but thought they'd enjoy colorful squares for now.  Next I folded and cut the pages in half to make squares a little smaller and also to give me three straight edges to fold squares.

This can be done one page at a time, but I found it went faster doing it production style.  One step on all pieces, then move to the next step on all pieces.

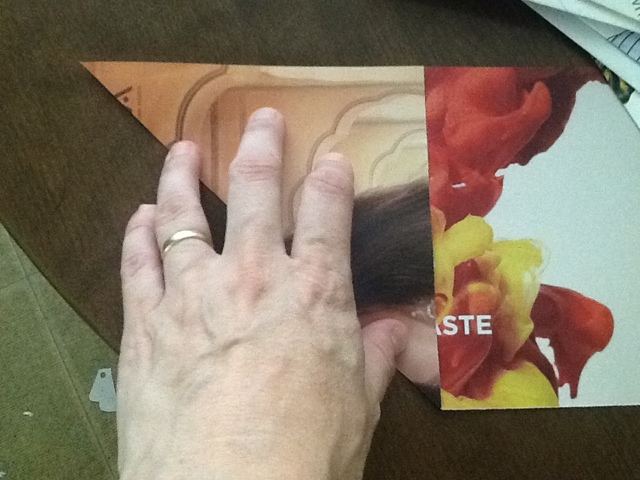
Next was to do the diagonal fold to establish a square so I know where to cut.

Almost done, cut the squares out.

And finally, flatten them and put them in a box.  Yay for free origami paper!!
I got pretty consistent squares using the half sheets and they are a good size for folding. I did cut a few pages at 2/3 or something other than 1/2 to capture different colors. Those are the bigger squares you see in the box.  

Thursday, June 27, 2013

What are you doing?

Found this book at the library.  Some of the techniques I'm familiar with (beaded, Tunisian, hairpin lace),  but there are a few new things I want to try out.  

First I'm trying entrelac.  This was chosen first, cause the other project i want to try requires multiple colors.   I've seen entrelac in knitting, but have never tried it before.  The whole squares are pretty easy once you figure out what's happening, but I'm struggling a bit figuring out the edge triangles.  


I really want to try the overlay crochet shown on the cover, so pretty!  Anyways, the book has lots of neat projects in it, check it out!

I'm trying this new thing. Actually doing some of the cool patterns I have pinned on Pinterest. :)  The winner this week is this cute little owl purse pattern at Maggie Makes Stuff  and had to try it out. I still need to add the zipper and lining. But isn't she cute!! I might add a little strap too, but haven't decided yet.


Lastly,  I joined The Crochet Crowd Amazing Shawl challenge this month.  It was a lot of fun to work on.  Once I got used to the pattern it was easy to work on while sitting with the kids at bedtime.  The nice thing is this pattern is a "join as you go" which means no sewing when you finish crocheting everything. Just hiding your tails, which you should be doing as finish each element anyways. But sometimes we get lazy and just want to finish the project already!! Yes I spent a couple days of just weaving in ends, Blah!


Close up of the design.  Can you tell I'm on a purple kick this month?
Finished shawl!  It's huge, about 6 1/2 ft long!  So proud of myself for finishing the whole thing!!

So that's what I've been working on.  How about you?  What projects do you have in the works?


Thursday, June 6, 2013

Farmer's market craft booth


Got to go set up a booth at a little local neighborhood farmer's market a couple weeks ago.  It was kind of slow that day and not a lot got sold, but I did get a little bit sold and had a lot of fun hanging out with my best friend and crocheting . 
These are the main attraction.  I'm making these beaded lace headbands for $15. I have made these with a loop of elastic at the back so they are stretchy and adjustable to fit most heads.  I have some already made or I am always willing to make one in colors you would like.   I can also add a jewelry clasp instead for $2 extra to be worn as a choker or wrap twice around your wrist as a bracelet.

I also enjoy making cute flowers in between projects or just to use up ends of yarn.  I put them on elastic loops for hair ties.

This is my latest project.  Learning some new bead crochet techniques. Starting with basic beaded chains, this one ended up being about 18 inches long. I love the fluorescent beads on the black chain. Reminds me of the 80's!

I also have one super cute newborn crown in light pink.  That's it in the bowl with the flowers.

Sunday, May 19, 2013

Old jeans into fabulous new skirt!

Looking for fabric for my daughter's doll project, I discovered this old pair of jeans prepped for making into a skirt.  I had taken out all of the inseam and then for some reason put them aside for another day.    I was wanting a new skirt for Spring, and this was a perfect, quick and easy project.

1.  Cut just beside (under) the seam on the front crotch on the curve so the cut away part will lay flat underneath side with the seam.  The seam can lay flat on top and be topstitched down. 

2.  On the back I pinned to get everything mostly flat and then sewed a straight seam down that line.  The open triangle in the back is lower and a little wider than in the front.  There is quite a bit of extra fabric on the inside of the back that can be cut away and zigzag or serge the edges to prevent fraying.

3.  At this point, I tried it on to check fit. Everything looked great except it dragging the floor.  While I love the floor length look, 4 kids running around makes floor lenght very impractical.  I took off 6 inches to bring my hem up to ankle length.

4. I've had this gorgeous, embroidered fabric sitting for a while, waiting for the right project.  I decided to cut my gores on the bias, so I matched a corner with the point of my triangle on the jeans and matched up the straight edges.   This made the gore fuller than the opening triangle which made a lovely flare.  I curved the gore just a bit to match the curve the legs were making. 

5.  Same for the back gore.  I zigzagged around all the edges of the gore to stop fraying. I also zigzagged the bottom of the jeans where I had cut them off.


6. Next I lined up the edges of the gore under the edges of the jeans and stitched along the previous seam lines.


7. To finish up the bottom seam I used a straight stitch to attach lace all around the bottom edge, then pressed the raw edge under and edge stitched to keep the lace facing down.


8. Sorry for the bad pic, didn't have anyone to be photographer for me.


Here's a little bit better. The skirt is very comfy and I've been wearing it everywhere.  This only took a few hours one evening.

Sunday, May 5, 2013

Cloth Diapers -AI2

I finished a couple of All-in-2 diapers for a customer this weekend. Got to try out the new Zorb II.  It's very thin and has a nice soft jersey outer layer so it can be used alone without needing to be encased.

All-in-2 diapers can be used just like an all-in-1, everything gets washed when wet or dirty, but the absorbent pad comes separate from the cover to speed drying time some. You do have to pair them back up after laundering, but no pocket to have to stuff.


First Step: Using diaper pattern of your choice (I made this pattern to match measurements, sort of based on the shape of Fuzzi Bunz). Cut out one each of PUL fabric, soft lining (velour), and cotton cover (optional).
I used a waterproof layer of plain white PUL with a cute cotton print layered outside of it just for looks. The white PUL is fine by itself if you like white diapers.  Inside I used jersey velour.  Very soft stuff that helps to wick moisture away from skin.


I layered them together the way I want them in the finished diaper. So that's cotton on the bottom, right side down, then the PUL shiny side facing up (into the diaper), lastly, the velour, fuzzy side up).

I stitched the three layers together with a straight stitch close to the edge just to keep them from sliding around while attaching FOE.  

Remember: when sewing PUL you want to avoid making unnecessary holes, so no pins, I usually use paper clips to hold layers together.


Next for gussets, sorry I didn't get a picture.  You just need a semi circle piece that matches the curve on the leg.  I just keep the curve that is leftover from cutting out the PUL layer and cut a straight line across to match two points about 1/4 of the way down the curve on each end.  We then sew on fold over elastic while stretching across the straight edge.   This gives you a gathered straight edge with the curve unbound.


Attach the gusset pieces to the inside layer of the diaper, matching the curve they came from. Wrong
side of the gusset should be facing the inside of the diaper. Now we're ready to attach the FOE to the diaper.


I like to start at the back, stretching the FOE across the middle of the back and around the leg curves.  To start the FOE use a zigzag stitch, backstitch a little at the beginning and then you can use the thread tail to pull   Be sure to catch the gusset edge in the elastic also.  Stretch just enough on the rest to conform to curves.

When you get all the way around, just overlap the elastic a bit. No need to fold under the ends or anything, it doesn't fray.


Last is the velcro. I usually attach the loop side on the tabs, since it could come in contact with skin. About 1 1/2" square is usually sufficient and I just zigzag all around to secure it down. Then the hook side is on the front of the diaper. Usually, a long strip across the front about an inch down from the top and an inch or two from each side to give plenty of room for size adjustment.  


To make the cover into an all-in-2, I added a strip of velcro to the back inside of the diaper a couple inches from the edge.  
I made an rectangular insert (1" less than the width of the cover in the middle and 1 or 2" less than the length of the cover) from 3 layers of Zorb-2, zig-zag stitched all around the edge. If using regular Zorb, it needs to covered in another fabric like the velour used for the inner diaper or flannel. The Zorb 2 has jersey on the outside and is pretty soft.    Attach a strip of hook tape to one side of the insert an inch or two from one end to hold it secure in the cover.

Washing Instructions:

To seal up holes from stitching, you can put the cover in a hot dryer before use. Avoid using the dryer for regular laundering as it weakens the PUL.   Wash in hot water, no bleach and definitely no fabric softener and hang to dry. I always use white vinegar in my rinse cycle. It helps remove odors and helps all soap rinse away.

With any absorbent diapers, you need to wash and dry them a few times (preferably in nice hot water) before use to "fluff" them for maximum absorbancy. Expect to get a bit of shrinkage in this process.
Never use fabric softener on cloth diapers, it causes fabric to repel liquids, definitely not something you want diapers to do!

Friday, May 3, 2013

Fabric plans

Just a teaser.

Tea dyed some cotton last night for this project that my daughter picked out. :)